This past February, thousands of ESXi servers were affected by a new ransomware attack (called ESXiARGS) that targeted the servers through a security flaw (tracked as CVE-2021-21972, CVE-2021-21973 and CVE-2021-21974), which is caused by a heap overflow issue in the OpenSLP service. The systems targeted appeared to be ESXi hypervisors in version 6.x and prior to 6.7.
In this article we will go over the steps to recover VMs that DO NOT have snapshots (-delta-sesparseflat-delta-sesparse
I’m going to assume that you already have stopped the attack and regained control on your ESXi Hypervisor, and only concentrate on recovering the virtual machines.
Recovery Prerequisites
Backup
The first thing to do, before anything else, create backup of the VM files:
- Either create a copy of the actual VM folder, or
- create a backup folder inside the VM folder and copy all files there.
Remove unnecessary files
The following files won’t be necessary for this process, and can safely be deleted. You should still have a copy of all of them in the backup you created previously, just in case.
- .args
- .vmxf
- .vmsd
- .vmsn
- .vmem
- .nvram
- .vmx – you restore it from the
.vmx~file.
You can remove them and recover the vmx
[root@esxihost:]$ mv VMNAME.vmx~ VMNAME.vmx
[root@esxihost:]$ rm *.args *.vmfx *.vmsd *.vmsn *.vmem *.nvram
Now your folder should look a little bit cleaner.
ESXiArgs – VM Recovery
Recreate VMDK file
- Note down the original size of the
-flatls -la
[root@esxihost:]$ ls -la
total 92925984
drwxr-xr-x    1 root     root          1120 Feb 26 18:01 .
drwxr-xr-t    1 root     root          2100 Feb  4 15:56 ..
drwxr-xr-x    1 root     root          3500 Feb 20 16:31 BKUP
-rw-------    1 root     root  107374182912 Feb  3 10:18 VMNAME-flat.vmdk
-rw-------    1 root     root          1045 Feb  3 10:18 VMNAME.vmdk
-rwx------    1 root     root          3449 Dec  5 17:12 VMNAME.vmx
- Delete the existing
.vmdkfile by typingrm -rf xxx.vmdk:
[root@esxihost:]$ rm VMNAME.vmdk
- Create a new “temp” disk (
-flat.vmdk.vmdkvmkfstools-flatls -la
[root@esxihost:]$ vmkfstools -c 107374182912 -d thin temp.vmdk
Create: 100% done.
- There should now be two new files, a
temp-flat.vmdktemp.vmdk-flat.vmdk - Edit the
temp.vmdk- On line 9, replace
temp-flat.vmdk-flat - If your disk WAS NOT thin provisioned, remove or comment out line 19
ddb.thinProvisioned - Save the file.
- On line 9, replace
# Disk DescriptorFile
version=1
encoding="UTF-8"
CID=fffffffe
parentCID=ffffffff
createType="vmfs"

# Extent description
RW 209715201 VMFS "WebServer_2-flat.vmdk"

# The Disk Data Base
#DDB

ddb.adapterType = "lsilogic"
ddb.geometry.cylinders = "13054"
ddb.geometry.heads = "255"
ddb.geometry.sectors = "63"
ddb.longContentID = "cf65c0c190124ab5571025d1fffffffe"
#ddb.thinProvisioned = "1"
ddb.uuid = "60 00 C2 94 74 7b 9f 6f-36 7e b3 ce d1 90 72 2f"
ddb.virtualHWVersion = "14"
At this point you should have something similar to this:
[root@esxihost:]$ ls -la
total 92925984
drwxr-xr-x    1 root     root          1120 Feb 26 18:01 .
drwxr-xr-t    1 root     root          2100 Feb  4 15:56 ..
drwxr-xr-x    1 root     root          3500 Feb 20 16:31 BKUP
-rw-------    1 root     root  107374182912 Feb  3 10:18 VMNAME-flat.vmdk  (ORIGINAL)
-rw-------    1 root     root          1045 Feb  3 10:18 VMNAME.vmdk       (Recreated & Edited)
-rwx------    1 root     root          3449 Dec  5 17:12 VMNAME.vmx        (Recovered from .vmx~)
Let’s now test these .vmdk-flat.vmdk
Create a new VM
- Create a new VM folder (outside of the original VM folder) called “Test”.
- You can do this either via the shell (SSH) or the Datastore Browser.
- Copy the following files into this folder:
VMNAME.vmdkVMNAME-flat.vmdk
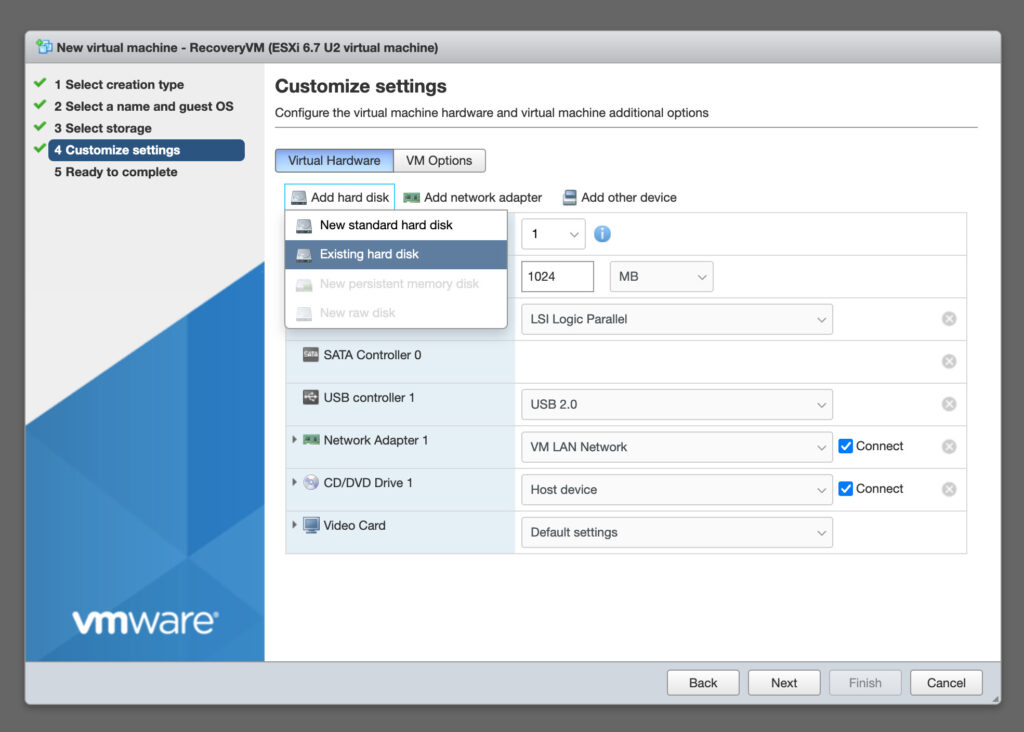
- Create a new VM through the UI:
- Same or similar CPU and RAM (I don’t think it makes a big difference).
- Remove the default Hard Disk, and add a new hard disk, selecting
Existing hard disk.vmdk - Under “CD/DVD Drive 1”, select Datastore ISO File and browse to a linux live CD. In my case I used Kali Linux Live CD, which worked. Make sure “Connect at power on” is selected.
- Start the VM.

Recover Partition with Testdisk
- Boot the Live CD – in my case with graphical interface – to try to recover your partition and re-install Grub. These steps may vary depending on what partitions you had on your VM.
- Open a terminal and use
testdiskLinux- Install
testdisk - Run
testdisk - Select the
No Log - Highlight the VM disk (usually
/dev/sdaProceed - Select the partition type (
Intel/PC - Select
Analyse - Select
Quick Search - Highlight your partition if found (in my case
Linux - If the partition table looks good, choose the
WriteY - When done, use
Quit - Use
fdisk -l - DO NOT RESTART.
- Install
Re-Install GRUB
- Re-install Grub with the following commands:
root@kali-live:~# mount /dev/sda1 /mnt
root@kali-live:~# mount --bind /dev /mnt/dev
root@kali-live:~# mount --bind /dev/pts /mnt/dev/pts
root@kali-live:~# mount --bind /proc /mnt/proc
root@kali-live:~# mount --bind /sys /mnt/sys
root@kali-live:~# chroot /mnt /bin/bash
root@kali-live:~# grub-install /dev/sda
- Exit the
chroot
Boot the VM
It should boot up the VM’s operating system from the -flat.vmdk
If this worked, the base VMDK and Flat file should be good! ✅ ?
Hopefully someone manages to find a way to recover Virtual Machines that have snapshots. If that happens, I’ll write about it!
Additional Information / Sources
The following are useful links for additional information:
